React知识点整理

复习React笔记。

1、react核心概念要点

1)JSX 防止注入攻击 可以安全地在 JSX 当中插入用户输入内容: React DOM 在渲染所有输入内容之前,默认会进行转义。它可以确保在你的应用中,永远不会注入那些并非自己明确编写的内容。所有的内容在渲染之前都被转换成了字符串。这样可以有效地防止 XSS(cross-site-scripting, 跨站脚本)攻击。

2)不要在render里面修改react组件的props,会造成反复渲染。

3)state 的更新可能是异步的 出于性能考虑,React 可能会把多个 setState() 调用合并成一个调用。

1
2
3
this.setState((state, props) => ({
  counter: state.counter + props.increment
}));

以上写法可以完美避免this.state.counter在被多次set以至于没有得到开发者想要的结果。

4)react数据流 React的数据流是向下流动的,render的渲染时自内向外的。

5)阻止默认事件和冒泡 React 中不能通过返回 false 的方式阻止默认行为。你必须显式的使用 preventDefault。阻止冒泡也不能使用cancelBubble = true;必须调用stopPropagation。 原因是:react的所有事件都绑定在页面根节点上,react提供了自己的一套事件处理机制,自己做好了事件的冒泡和捕获。react只能通过它预留出来的方法进行阻止默认事件或冒泡,恰好react保留的是preventDefault和stopPropagation方法。 具体的react合成事件对象参照:合成事件 详细原理参考:React 中阻止事件冒泡的问题

6)事件绑定写法

1
2
3
4
5
6
7
8
9
10
11
12
13
14
class LoggingButton extends React.Component {
  // 此语法确保 `handleClick` 内的 `this` 已被绑定。
  // 注意: 这是 *实验性* 语法。
  handleClick = () => {
    console.log('this is:', this);
  }
  render() {
    return (
      <button onClick={this.handleClick}>
        Click me
      </button>
    );
  }
}

写法优于

1
2
3
4
5
6
7
8
9
10
11
12
13
14
class LoggingButton extends React.Component {
  handleClick() {
    console.log('this is:', this);
  }

  render() {
    // 此语法确保 `handleClick` 内的 `this` 已被绑定。
    return (
      <button onClick={() => this.handleClick()}>
        Click me
      </button>
    );
  }
}

此语法问题在于每次渲染 LoggingButton 时都会创建不同的回调函数。浪费内存资源。

7)事件传参的两种写法

1
2
3
4
5
// 用箭头函数是因为箭头函数的this指的是定义时的this而不是调用时的this 能够确保this永远是组件实例
<button onClick={(e) => this.deleteRow(id, e)}>Delete Row</button>

// 如果不用bind,那么函数接收的唯一参数就只能是react的合成事件对象
<button onClick={this.deleteRow.bind(this, id)}>Delete Row</button>

8)非受控组件 是非受控组件。 它的value只读,value不受state控制,也没有onChange事件监听。

9)状态提升 将state放在父级组件,使其子组件得以共享数据源。

10)props.children props.children是一个特定关键字,预留了react组件的子组件,如:

1
2
3
<select>
    <option>1</option>
</select> 

其中select的props.children就是option。

11)关于react组件继承 我们在成百上千个组件中使用 React。我们并没有发现需要使用继承来构建组件层次的情况。一般情况下wooden自定义组件不需要互相继承,更多是通过extend继承React.Component。 最主要原因是由于组件之间的state和生命周期不能共享,需要单独维护。

12)创建react项目步骤:

  • 执行命令sudo npm install -g create-react-app 下载react项目构建工具‘create-react-app’
  • 执行命令create-react-app tianyuan-react-app 构建名为‘tianyuan-react-app’的react项目
  • 执行命令 cd tianyuan-react-app 进入新构建的项目中
  • 执行命令 npm install redux –save 安装redux(没加-dev,因此安装的redux在package.json的dependencies里面)
  • 执行npm run eject查看当前项目的webpack配置文件。 执行之后,会拷贝一份项目默认的webpack配置到本地,生成一个同src同级的config文件夹。因此,开发者再去修改webpack配置时,将不必修改项目默认的webpack配置,因为此时项目是直接采用config文件夹里面的配置,修改config文件夹里面的配置即可。
  • 执行命令npm install react-redux –save安装react-redux工具。

2、React进阶

1)context

1
2
3
4
5
6
7
8
9
10
11
12
13
14
15
16
17
18
19
20
21
22
23
24
25
26
27
28
29
30
31
32
33
34
35
36
37
38
39
40
41
42
43
44
45
46
47
48
49
50
51
52
53
54
55
56
57
58
59
60
61
62
63
64
65
66
67
68
69
70
71
72
73
74
75
76
77
78
import React from 'react';

export const themes = {
    light: {
        foreground: '#000000',
        background: '#eeeeee',
    },
    dark: {
        foreground: '#ffffff',
        background: '#222222',
    },
};

// Context 可以让我们无须明确地传遍每一个组件,就能将值深入传递进组件树。
// 为当前的 theme 创建一个 context(“light”为默认值)。

const ThemeContext = React.createContext(themes.dark);
ThemeContext.displayName = 'TyDisplayName';

class ToolApp extends React.Component {
    constructor(props) {
        super(props);
        this.state = {
            theme: themes.light,
        };
        this.toggleTheme = () => {
            this.setState(state => ({
              theme:
                state.theme === themes.dark
                  ? themes.light
                  : themes.dark,
            }));
        };
    }
    
    render() {
        // 在 ThemeProvider 内部的 ThemedButton 按钮组件使用 state 中的 theme 值,
        // 而外部的组件使用默认的 theme 值
        return (
            <div>
                <ThemeContext.Provider value={this.state.theme}>
                    <Toolbar changeTheme={this.toggleTheme}/>
                </ThemeContext.Provider>
                <ThemedButton/>
            </div>
        );
    }
}

// 一个使用 ThemedButton 的中间组件
function Toolbar(props) {
    const contextType = ThemeContext;
    console.log(contextType); 
    return (
        <ThemedButton onClick={props.changeTheme}>
            Change Theme
        </ThemedButton>
    );
}
  
class ThemedButton extends React.Component {
    // 指定 contextType 读取当前的 theme context。是必须要加的操作,不然this.context获取不到数据
    // React 会往上找到最近的 theme Provider,然后使用它的值。
    // 在这个例子中,当前的 theme 值为 “dark”。
    static contextType = ThemeContext;
    render() {
        const {props} = this;
        const theme = this.context;
        console.log(this.context); // 打印出dark
        return <button {...props} style= />;
    }
}

export default ToolApp;

/**
 * 如果只有最深层的组件需要某个数据,那么这个数据通过组建层层传递非常冗余且麻烦,通过context能够很好的解决这个问题。
 */

App.js代码如下:

1
2
3
4
5
6
7
8
9
10
11
12
13
14
import React from 'react';
import logo from './logo.svg';
import './App.css';
import ToolApp from './toolbar/index';

function App() {
  return (
    <div className="App">
      <ToolApp/>
    </div>
  );
}

export default App;

注意: 因为 context 会根据引用标识来决定何时进行渲染(本质上是 value 属性值的浅比较),所以这里可能存在一些陷阱,当 provider 的父组件进行重渲染时,可能会在 consumers 组件中触发意外的渲染。举个例子,当每一次 Provider 重渲染时,以下的代码会重渲染所有下面的 consumers 组件,因为 value 属性总是被赋值为新的对象。为了防止这种情况,将 value 状态提升到父节点的 state 里。

context实现原理参考:https://juejin.cn/post/6844904175294251022


2)refs 下面是几个适合使用 refs 的情况:

  • 管理焦点,文本选择或媒体播放。
  • 触发强制动画。
  • 集成第三方 DOM 库。

ref属性的特点: 当 ref 属性用于 HTML 元素时,构造函数中使用 React.createRef() 创建的 ref 接收底层 DOM 元素作为其 current 属性。 当 ref 属性用于自定义 class 组件时,ref 对象接收组件的挂载实例作为其 current 属性。 不能在函数组件上使用 ref 属性,因为他们没有实例。 如果要在函数组件中使用 ref,你可以使用 forwardRef(可与 useImperativeHandle 结合使用),或者可以将该组件转化为 class 组件。

React 会在组件挂载时给 current 属性传入 DOM 元素,并在组件卸载时传入 null 值。ref 会在 componentDidMount 或 componentDidUpdate 生命周期钩子触发前更新。

1
2
3
4
5
6
7
8
9
10
11
12
13
14
15
16
17
18
19
20
21
22
23
24
25
26
27
28
29
30
31
32
33
34
35
36
37
38
39
40
41
42
43
class CustomTextInput extends React.Component {
    constructor(props) {
      super(props);
      // 创建一个 ref 来存储 textInput 的 DOM 元素
      this.textInput = React.createRef();
      this.focusTextInput = this.focusTextInput.bind(this);
    }

    componentWillMount() {
        // 这里this.textInput.current的值为null
        console.log(this.textInput);
    }

    componentDidMount() {
        // 在这里可以获取到this.textInput的值 因为dom已经加载完
        console.log(this.textInput);
    }
  
    focusTextInput() {
      // 直接使用原生 API 使 text 输入框获得焦点
      // 此时this.textInput.current拿到的是一个真实的dom元素 可直观的调用元素的任何方法
      this.textInput.current.focus();
    }
  
    render() {
      // 告诉 React 我们想把 <input> ref 关联到
      // 构造器里创建的 `textInput` 上
      return (
        <div>
          <input
            type="text"
            ref={this.textInput} />
          <input
            type="button"
            value="Focus the text input"
            onClick={this.focusTextInput}
          />
        </div>
      );
    }
  }

  export default CustomTextInput;

React提供的 Ref forwarding 方案用来将 ref 通过组件传递给其子节点。这种场景对于可复用组件库和高阶组件很有用。

也就是说,可以使用 React.forwardRef 函数将 ref 转发到组件中,Ref forwarding 允许组件接收一个 ref,并将它向下传递 / 转发(用来点题)给子组件。

1
2
3
4
5
6
7
8
9
10
11
12
13
14
15
16
17
18
const TextInput = React.forwardRef((props, ref) => (
  <input type="text" placeholder="请输入表名" ref={ref} />
));
const inputRef = React.createRef();
class CustomTextInput extends React.Component {
   handleSave = () => {
    console.log(inputRef.current.value);
  };

  render() {
    return (
      <div>
        <TextInput ref={inputRef} />
        <button onClick={this.handleSave}>保存</button>
      </div>
    );
  }
}

以上代码做了如下操作:

  • 使用 React.createRef() 创建一个 ref 实例(inputRef);
  • 将 ref 实例指定给组件(TextInput)的 ref 属性 ;
  • React.forwardRef()方法将 ref 实例作为其回调函数的第二个参数向下转发给底层DOM组件();
  • 在外层组件中能够通过 current对象访问DOM节点值。

以上代码,可以认为ref通过两层传递,从CustomTextInput组件传到input,最终获取到了input元素。

回调ref

回调refs的作用是在 componentDidMount 或 componentDidUpdate 触发前,保证 refs 一定是最新的实体元素。

1
2
3
4
5
6
7
8
9
this.setTextInputRef = element => {
// element是真实的元素,赋值给this.textInput
  this.textInput = element;
};
// ...
<input
  type="text"
  ref={this.setTextInputRef}
/>

可参考https://zhuanlan.zhihu.com/p/110562899


3)fragments

React.Fragment 就是 <></>。

区别是可以带key。


3、React16新的生命周期

图片

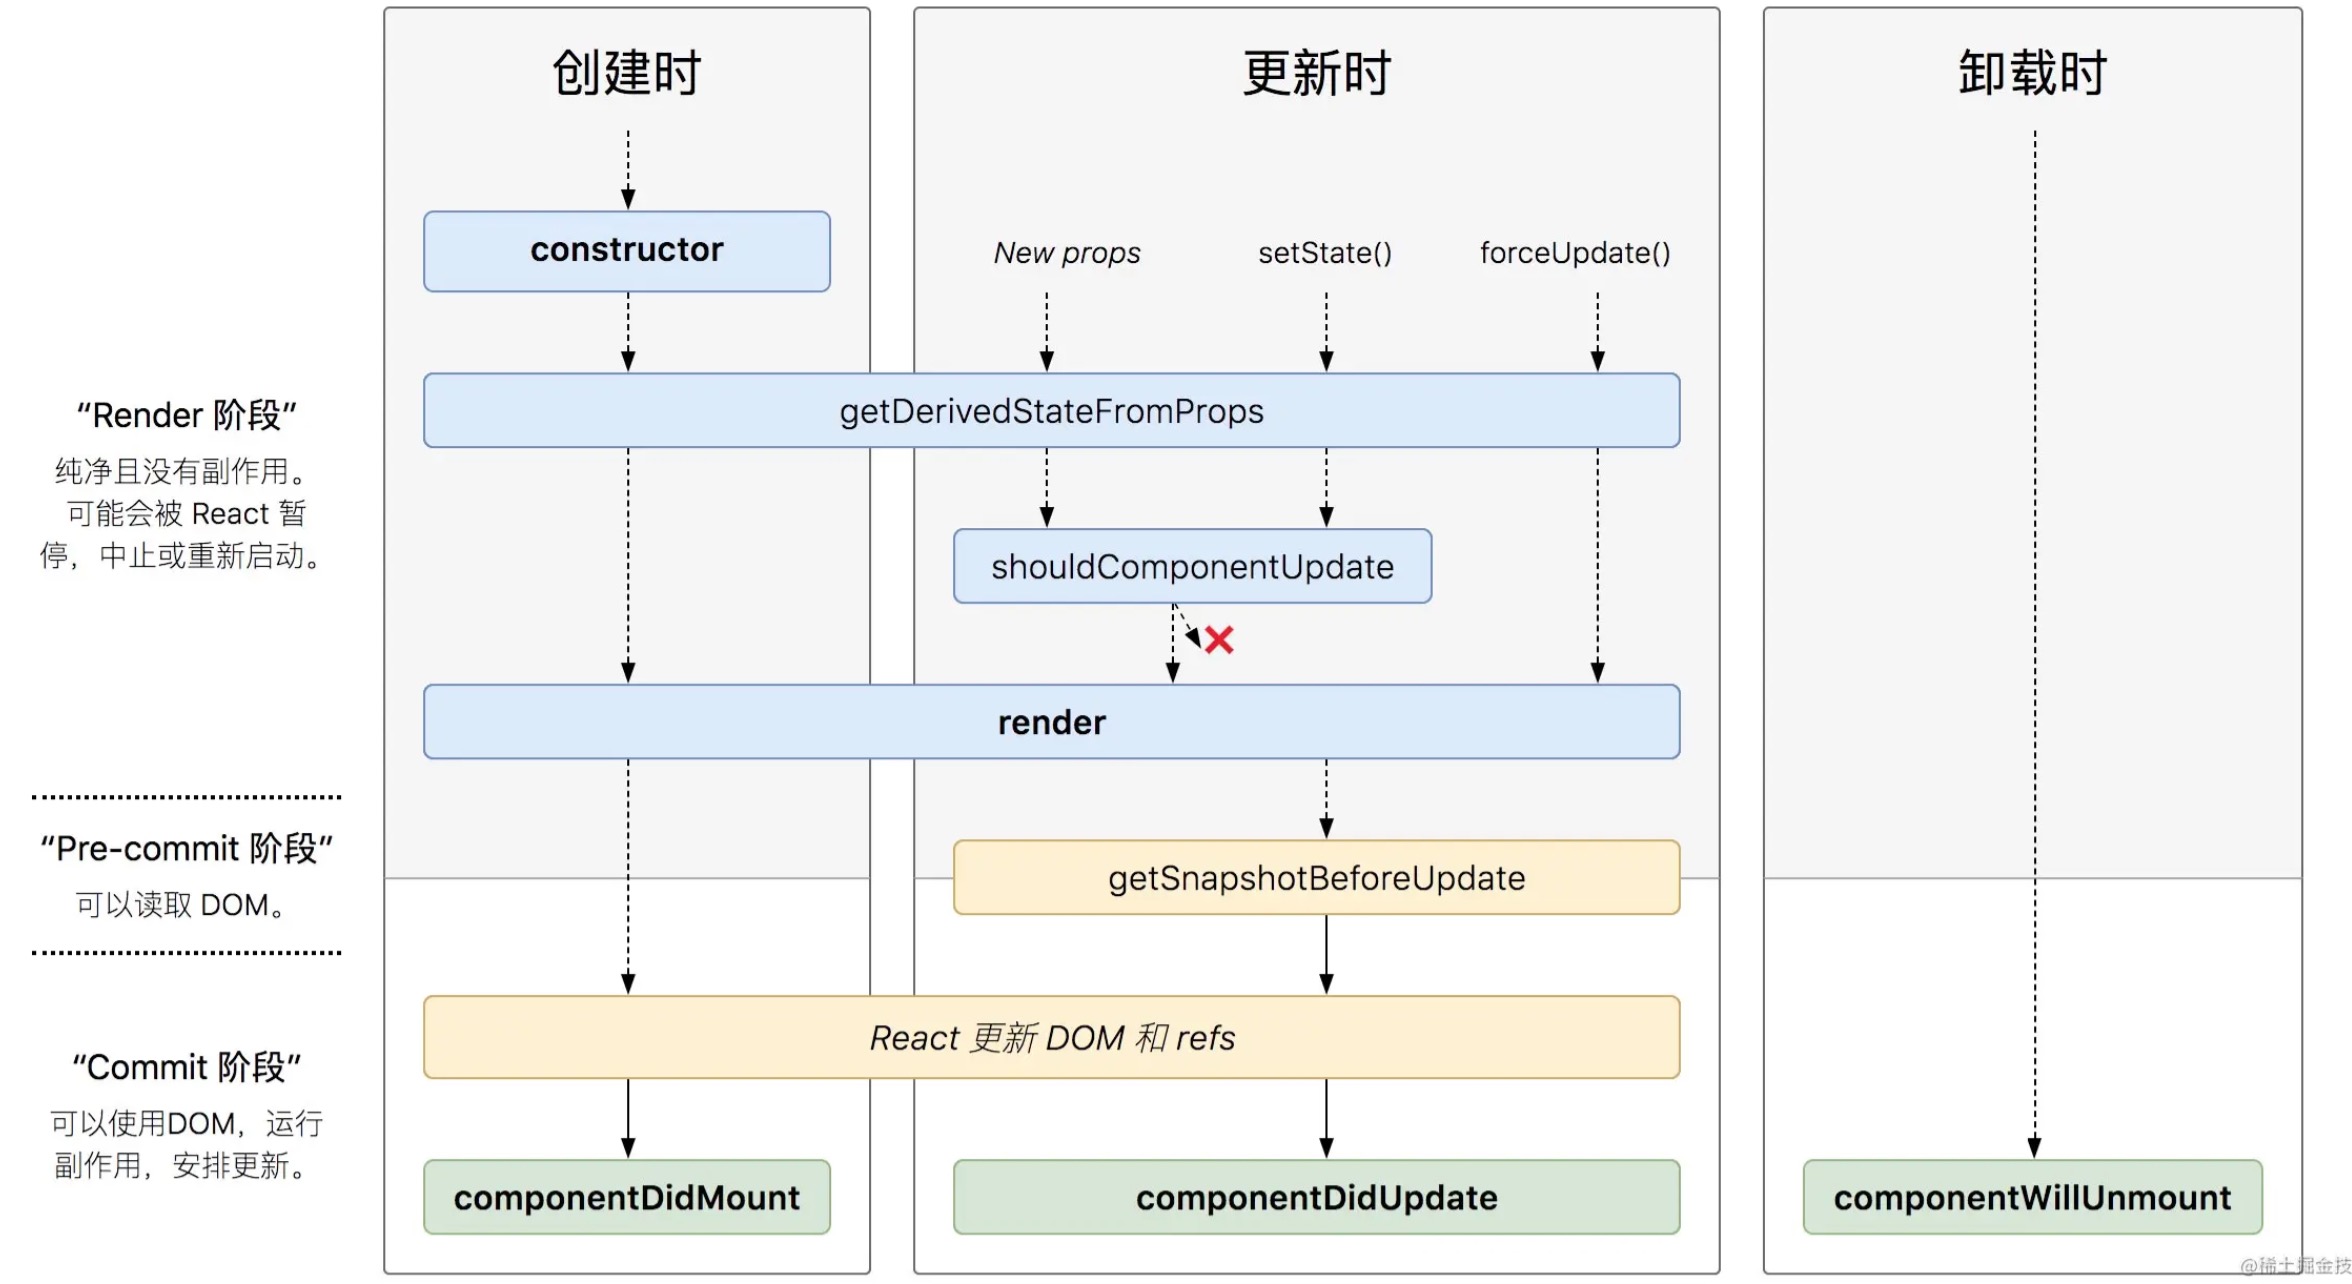
mount阶段:constructor ->getDerivedStateFromProps->render->componentDidMount

更新阶段:getDerivedStateFromProps->shouldComponentUpdate->render->componentDidUpdate

卸载:componentWillUnmount

生命周期调整原因:React改成fiber架构之后,那三个will生命周期,可能会多次重复执行。

去掉了三个will: componentWillMount、componentWillReceiveProps、componentWillUpdate

Demo:

1
2
3
4
5
6
7
8
9
10
11
12
13
14
15
16
17
18
19
20
21
22
23
24
25
26
27
28
29
30
31
32
33
34
35
36
37
38
39
40
41
42
43
44
45
46
47
48
49
50
51
52
53
54
55
import React from "react";

class List extends React.PureComponent {
  state = {
    count: 0,
  };
  constructor(parameters) {
    super(parameters);
    console.log("constructor", parameters);
  }

  static getDerivedStateFromProps(nextProps, prevState) {
    console.log("getDerivedStateFromProps", nextProps);
    return {
      count: nextProps.count,
    };
  }

  // 废弃
  componentWillMount() {}

  componentDidMount() {
    console.log("componentDidMount", this.state);
  }
  // 废弃
  componentWillReceiveProps() {}


  // 废弃
  componentWillUpdate() {
    console.log("componentWillUpdate", this.state);
  }

  shouldComponentUpdate(nextProps,nextState){
    console.log("shouldComponentUpdate",this.props,this.state);
    return true
  }

  componentDidUpdate() {
    console.log("componentDidUpdate", this.state);
  }

  static getSnapshotBeforeUpdate(prevProps, prevState) {
      
  }

  componentWillUnmount() {}

  render() {
    console.log('render', this.state.count);
    return <div>{this.state.count}</div>;
  }
}

export default List;

16.8的重大更新 fiber 生命周期 hooks

4、React16新的特性

5、React中组件传递数据的方式, 父子,子父,兄弟

6、React中列表元素为什么要加key属性

React中的列表组件需要加key属性,不加的话在本地控制台会显示一个警告:“Warning: Each child in a list should have a unique “key” prop”。而生产环境不会。

下面我们来深入了解一下key:

  • key属性的作用

1)由于React是利用模板引擎对页面进行渲染,新旧Dom树进行对比后再转化成真实的Dom树。每当有props或者state的数据发生改变时,都会触发render,返回一个新的组件树。

2)如果一个组件内部特别复杂的时候,新旧组件树的对比将会非常消耗性能,算法复杂度能达到O(n)3,显然是不能被接受的。

3)因此为了解决此性能问题,提出了一种启发式算法,将新旧Dom对比转化成真实Dom的过程的算法复杂度降低到O(n)。具体如下:

这种算法将对React组件进行假设和预判。

假设是指页面元素的类型不同,将会渲染出完全不同的树。

预判是任意一个父组件的每一次渲染,同一个 key 属性的子组件应该是稳定的(每一次父组件执行 render() 方法的时候,同一个 key 属性值永远标识唯一的 React 组件)。

4)使用key属性的好处:由于React启发式算法中将key属性作为组件唯一标识的规则,无论是从哪个位置插入新元素, React在下次渲染的时候,仍然能够识别这些组件,不会对原来的旧组件执行变更操作。

5)key属性遵循的原则:唯一、稳定。

  • 如果没有key属性,会引发什么样的问题

在没有为组件设置 key 属性的情况下,React 会默认将数组索引设置为 key 属性的值。

数组索引赋值给key的问题:比如选中的数据更改排序,那么选中的数据就发生了变化。

  • 如何声明key

因此大多数时候用一个唯一且稳定的标识来给key赋值,一般考虑用API返回的id来确定key的值。

  • eslint中与key有关的规则

eslint-plugin-React 中

1
2
"React/jsx-key" // 检查是否声明了 key 属性
"no-array-index-key" //检查是否使用了数组索引声明 key 属性

参考:React列表循环为什么需要key

7、React中的高阶组件(HOC)

高阶组件是参数为组件,返回值为新组件的函数。 不是react的语法,是基于 React 的组合特性而形成的设计模式。

HOC 在 React 的第三方库中很常见,例如 Redux 的 connect 和 Relay 的 createFragmentContainer。

不要试图在 HOC 中修改组件原型,我们只是给原有的组件增添一些功能。可以将 HOC 视为参数化容器组件。

HOC 还可以传递从外界传入的props。大多数 HOC 都可以包含一个类似于下面的 render 方法:

1
2
3
4
5
6
7
8
9
10
11
12
13
14
15
16
render() {
  // 过滤掉非此 HOC 额外的 props,且不要进行透传
  const { extraProp, ...passThroughProps } = this.props;

  // 将 props 注入到被包装的组件中。
  // 通常为 state 的值或者实例方法。
  const injectedProp = someStateOrInstanceMethod;

  // 将 props 传递给被包装组件
  return (
    <WrappedComponent
      injectedProp={injectedProp}
      {...passThroughProps}
    />
  );
}

这种约定保证了 HOC 的灵活性以及可复用性。

HOC的典型应用:connect

1
2
// React Redux 的 `connect` 函数
const ConnectedComment = connect(commentSelector, commentActions)(CommentList);

等同于

1
2
3
4
// connect 是一个函数,它的返回值为另外一个函数。
const enhance = connect(commentListSelector, commentListActions);
// 返回值为 HOC,它会返回已经连接 Redux store 的组件
const ConnectedComment = enhance(CommentList);

connect 是一个返回高阶组件的高阶函数!

注意,不要在 render 方法中使用 HOC!看下面的例子:

1
2
3
4
5
6
7
render() {
  // 每次调用 render 函数都会创建一个新的 EnhancedComponent
  // EnhancedComponent1 !== EnhancedComponent2
  const EnhancedComponent = enhance(MyComponent);
  // 这将导致子树每次渲染都会进行卸载,和重新挂载的操作!
  return <EnhancedComponent />;
}

这种操作相当于在render里面修改state中的数据一样,导致页面反复渲染。

ref不在props里面,一般传递props的时候,ref传递不到组件里面。

高阶组件最大的缺点是:无法继承静态属性(static)。 这些静态属性被高阶组件包裹一层之后,无法在传递进来的该组件中使用。除非用高阶组件中再添加一个静态方法去手动调用该组件的静态属性。代码如下:

1
2
3
4
5
6
function enhance(WrappedComponent) {
  class Enhance extends React.Component {/*...*/}
  // 手动增加静态属性或方法
  Enhance.staticMethod = WrappedComponent.staticMethod;
  return Enhance;
}

或者通过使用 hoist-non-react-statics 自动拷贝所有非 React 静态方法。

高阶组件demo:

1
2
3
4
5
6
7
8
9
10
11
12
13
14
15
16
17
18
19
20
21
22
23
24
25
26
27
28
29
30
31
32
33
34
35
36
37
38
39
40
41
42
43
44
45
46
47
import CommentList from "./commentList";
import BlogPost from "./blogPost";

const CommentListWithSubscription = withSubscription(
    CommentList,
    (DataSource) => DataSource.getComments()
);

const BlogListWithSubscription = withSubscription(
    BlogPost,
    (DataSource, props) => DataSource.getBlogPost(props.id)
);

// 该函数接收一个组件 并返回一个新组件
function withSubscription(WrappedComponent, fn) {
    return class extends React.Component{
      constructor(props) {
        super(props);
        this.handleChange = this.handleChange.bind(this);
        this.state = {
            data: fn(DataSource, props),
        };    
      }

    componentDidMount() {
      // 订阅更改
      DataSource.addChangeListener(this.handleChange);
    }

    componentWillUnmount() {
      // 清除订阅
      DataSource.removeChangeListener(this.handleChange);
    }

    handleChange() {
      // 当数据源更新时,更新组件状态
      this.setState({
          data: fn(DataSource, this.props),
      });
    }

    render() {
      // this.props 传递其他属性
      return <WrappedComponent data={this.state.data} {...this.props}/>
    }
  }
}

8、React中函数组件和class组件的区别

1)class组件特点:

  • 有组件实例;
  • 有生命周期;
  • 有 state 和 setState。

2)函数组件特点:

  • 没有组件实例;
  • 没有生命周期;
  • 没有 state 和 setState,只能接收 props;
  • 函数组件是一个纯函数,执行完即销毁,无法存储 state。

class 组件存在的问题:

  • 大型组件很难拆分和重构,变得难以测试;
  • 相同业务逻辑分散到各个方法中,可能会变得混乱;
  • 复用逻辑可能变得复杂,如 HOC 、Render Props。

所以 react 中更提倡函数式编程,因为函数更灵活,更易拆分,但函数组件太简单,所以出现了hook,hook就是用来增强函数组件功能的。

在react16.8版本中添加了hooks,使得我们可以在函数组件中使用useState钩子去管理state,使用useEffect钩子去使用生命周期函数。因此,2、3两点就不是它们的区别点。从这个改版中我们可以看出作者更加看重函数组件,而且react团队曾提及到在react之后的版本将会对函数组件的性能方面进行提升。

参考:React 函数组件和class组件区别